Face Re-Paints
I've found a number of guides on re-painting doll faces, but most of them seem far beyond the average level of skill. (But gorgeous!) I tried to take the tips and simplify them. Here's what was helpful for me.

Materials
- paint thinner (everyone recommends acetone nail polish remover, but this is faster)
- q-tips, cotton balls
- a tiny paintbrush (10/0 spotter is nice to start)
- acrylic paints (liquid is better, I used the solid kind I already owned)
- sealer (Liquitex Matte Varnish is recommended, I already owned a glossy and used that)
- exacto blade
- a little bowl of water (clean brushes)
- clean-up cloth
- a lamp

Tips
- Don't mix your paints with water. This will make them easier to be rubbed off. Mix with the clear varnish instead.
- Symmetry may be impossible- aim for balance. (Human faces aren't perfect either!)
- For practice, try painting on top of existing features first rather than wiping the face clean.
- Holding the brush: don't jam the brush down on the face. Paint with just the very tip of the brush, barely touching it.
- Save pictures of doll eye styles you'd like to emulate. I enjoy when the Toy Box Philosopher does close-up shots of the face when she's reviewing!
- Relax! It will look better from a distance.
Cleaning the face
I like to boil rinse and clean my barbies before I start re-decorating. Give your doll a ponytail to keep her hair out of her face. Wait until her face is painted to start work on a fancy hairdo.
 |
| goodbye, terrifying blue lipstick |
 |
| many 10s of minutes scrubbing with nail polish remover |
 |
| a clean sweep with paint thinner |
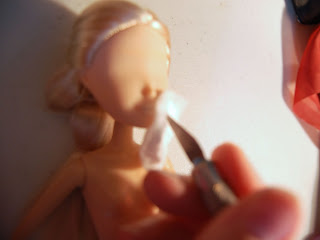
Using nail polish remover paint thinner and q-tips, wipe and scrub the face to remove existing paint. Some is easier to remove than others (I found Monster High & Fairy Tale High paint almost impossible to scrub off until I switched to paint thinner.) For paint in crevices, try gently scratching through the damp cotton ball with an exacto blade.

Painting
1.
Eyebrows and sclera
Burnt sienna and raw umber are nice colors for eyebrows.
Barbie dolls have the outline of the eye in the facial mold. Some dolls, like the Fairy Tale High doll above, do not. I used a pencil to create my own outline before I started painting.

The sclera (eye whites) doesn't need to be bright white. Adding just the tiniest bit of black to create gray is more realistic. Tip: paint several thin coats and give them each time to dry.
Advanced: shade across the top for shadow or along sides to create roundness.

2.
Iris, pupil, light reflections.
Use a pencil to draw the circle of the iris. You can even take an eraser to trace around. (I used frosting tips.) Part of the iris is usually covered by the eyelid.
Lots of colors make lovely irises. Skipper has burnt sienna. Advanced: use two shades. Either outline the iris, use different colors on top and bottom, or tiny radiating lines pulling out from the center.


3.
Lipstick: try mixing burnt sienna, scarlet, and white in tones you like.
Eyeshadow: mix with varnish to make it translucent. Draw a darker line to emphasize the eyelid fold.


4.
Draw a large pupil. (A tiny pupil makes your doll look high.) Solid black pupils are most realistic.I like solid black eyelashes as well. (My 80's Barbies had blue eyelashes!) Use the tiniest brush strokes possible, hardly touching the face. Use a very thin line toward the center of the eye, then thick is okay for the outside of the eye. Also, be careful with how much you are covering up the eye with the eyelash. Too much eyeliner makes your doll look sleepy.
Using bright white, create some light reflections. Two per eye is nice, and they can be any shape. (Round dot is easiest.) Light reflection should be identical on both eyes, not symmetrical! If you dotted the upper left corner on the left eye, dot the upper left corner on the right eye as well.
 |
| Extra large eyes have room for more detail. |
Some of my early attempts
With Birdie (left), I painted new eyes on top of her existing eyes. They ended up large! It was sort of an anime effect, and looked cute anyway, so I kept it. Both dolls below kept their original eyebrows. Birdie had a boil perm and Hester got this hairstyle.Birdie demonstrates some different shapes for light reflections. Hester has radiating dark blue on her light blue irises.

Skipper with lots of freckles was fun to paint. I regret sealing her whole face with shiny varnish. Buy matte instead. I tried a different eye shape with my Barbie on the left. (Find out how to make her locs over at How to Play with Barbies. It took me much longer than 20 minutes though.)

New face paint gave these once identical dolls new life and personality! I immediately knew their names, their friendship, and gave them some hobbies. (These hobbies wouldn't be possible without their new Liv bodies as well, check out this re-bodying tutorial.)


I tried different shaped eyes and styles with my Fairy Tale High dolls. Drawing large eyes is much easier for detail work.

I tried simple designs for regular sized Barbie heads. These two dolls have lovely hair courtesy of another How to Play with Barbies tutorial. However, I would recommend re-painting faces before doing elaborate hairstyles. A simple braid or ponytail is best for keeping hair away from paint.
Professional Guides:
http://www.fantasydollsbyd.com/New_page_81.htm (this guide uses a larger doll, so details can be more noticeable. Also, check out her Monster High repaints- they're to die for!)
http://www.dolls-n-daggers.com/Dolls/OOAKtipspainting.php (love her little helpful tips, like on dealing with shaking hands)

This looks hard to do- you are very talented with their eyes though. the detail is great!
ReplyDeleteThank you! It was a good first attempt. People online do AMAZING things with this. I want to keep doing more
Delete